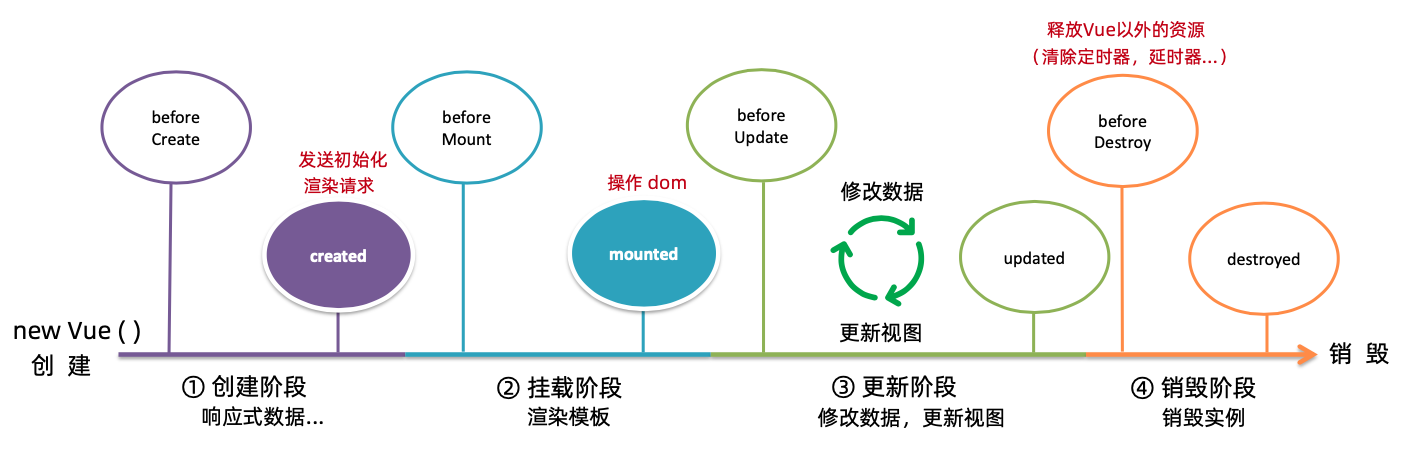
1.生命周期
Vue 生命周期和生命周期的四个阶段
- vue 生命周期:一个 Vue 实例从创建到销毁的过程
- 生命周期四个阶段:创建、挂载、更新、销毁

Vue 生命周期函数(钩子函数)
- Vue 生命周期过程中,会自动运行一些函数,被称为【生命周期钩子】,让开发者可以在特定阶段运行自己的代码

<body>
  <div id="app">
    <h3></h3>
    <div>
      <button @click="count--">-</button>
      <span></span>
      <button @click="count++">+</button>
    </div>
  </div>
  <script src="./vue.js"></script>
  <script>
    const app = new Vue({
      el: '#app',
      data: {
        count: 100,
        title: '计数器'
      },
      // 1.创建阶段(准备数据)
      beforeCreate() {
        console.log("beforeCreate 响应式数据准备好之前",this.count)
      },
      created() {
        console.log("created 响应式数据准备好之后",this.count);
      },
      // 2.挂载阶段(渲染模板)
      beforeMount() {
        console.log("beforeMount 模板渲染之前",document.querySelector("h3"))
      },
      mounted() {
        console.log("mounted 模板渲染之后",document.querySelector("h3"))
      },
      // 3.更新阶段
      beforeUpdate() {
      },
      updated() {
      },
      // 4.销毁阶段
      beforeDestroy() {
      },
      destroy() {
      }
    })
  </script>
</body>
案例:输入框自动聚焦

<body>
<div class="container" id="app">
  <div class="search-container">
    <img src="https://www.itheima.com/images/logo.png" alt="">
    <div class="search-box">
      <input type="text" v-model="words" id="inp">
      <button>搜索一下</button>
    </div>
  </div>
</div>
<script src="./vue.js"></script>
<script>
  const app = new Vue({
    el: '#app',
    data: {
      words: ''
    },
    mounted() {
      document.querySelector("input").focus()
    }
  })
</script>
</body>
2.综合案例
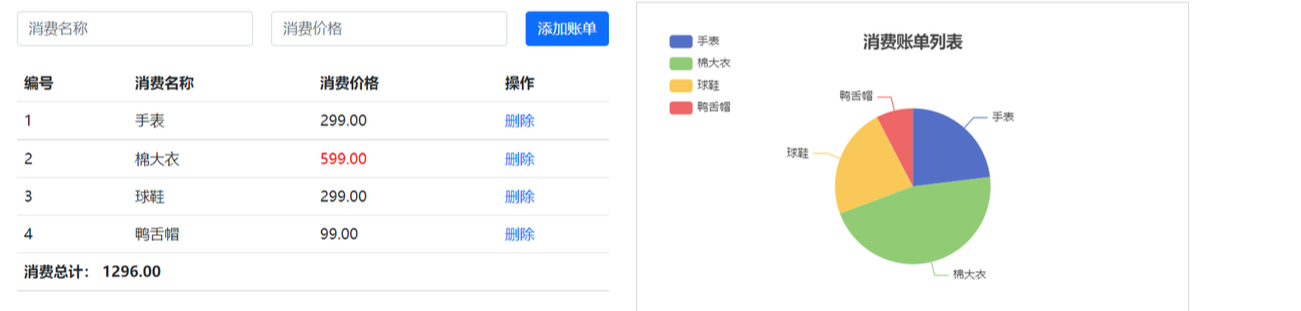
- 需求
- 基本渲染
- 添加功能
- 删除功能
- 饼图渲染【echars】
<body>
    <div id="app">
      <div class="contain">
        <!-- 左侧列表 -->
        <div class="list-box">
          <!-- 添加资产 -->
          <form class="my-form">
            <input type="text" v-model.trim="name" class="form-control" placeholder="消费名称" />
            <input type="text" v-model.number="price" class="form-control" placeholder="消费价格" />
            <button type="button" class="btn btn-primary" @click="addOrder">添加账单</button>
          </form>
          <table class="table table-hover">
            <thead>
              <tr>
                <th>编号</th>
                <th>消费名称</th>
                <th>消费价格</th>
                <th>操作</th>
              </tr>
            </thead>
            <tbody>
              <tr v-for="(item,index) in list">
                <td>{{ index + 1 }}</td>
                <td>{{ item.name}}</td>
                <td :class="{ red: item.price > 500}">{{ item.price }}</td>
                <td><a href="javascript:;" @click="del(item.id)">删除</a></td>
              </tr>
            </tbody>
            <tfoot>
              <tr>
                <td colspan="4">消费总计: {{ totalPrice }}</td>
              </tr>
            </tfoot>
          </table>
        </div>
        <!-- 右侧图表 -->
        <div class="echarts-box" id="main"></div>
      </div>
    </div>
    <script src="echarts.min.js"></script>
    <script src="vue.js"></script>
    <script src="axios.js"></script>
    <script>
      /**
       * 接口文档地址:
       * https://www.apifox.cn/apidoc/shared-24459455-ebb1-4fdc-8df8-0aff8dc317a8/api-53371058
       */
      const app = new Vue({
        el: '#app',
        data: {
          list: [],
          name: "",
          price: "",
          myChart: ""
        },
        created() {
          this.getList()
        },
        methods: {
          async addOrder(){
            await axios.post("https://applet-base-api-t.itheima.net/bill",{
              creator: "浩楠",
              name: this.name,
              price: this.price
            }).then(res => {
              this.getList()
            })
          },
          async getList() {
            const res = await axios({
              url: "https://applet-base-api-t.itheima.net/bill",
              params: {
                creator: "浩楠"
              }
            })
            this.list = res.data.data

            // 更新图标
            this.myChart.setOption({
              series: [
                {
                  name: '消费账单',
                  type: 'pie',
                  radius: '60%',
                  data: this.list.map(item => ({value: item.price, name: item.name})),
                }
              ]
            })
          },
          async del(id){
            console.log(id)
            await axios.delete(`https://applet-base-api-t.itheima.net/bill/${id}`,).then(res => {
              this.getList()
            })
          }
        },
        computed: {
          totalPrice(){
            return this.list.reduce((previous,item) => previous + item.price,0).toFixed(2)
          }
        },
        mounted() {
          this.myChart = echarts.init(document.querySelector("#main"))
          // 饼图
          this.myChart.setOption({
            title: {
              text: '消费账单列表',
              left: 'center'
            },
            tooltip: {
              trigger: 'item'
            },
            legend: {
              orient: 'vertical',
              left: 'left'
            },
            series: [
              {
                name: '消费账单',
                type: 'pie',
                radius: '50%',
                data: [
                  { value: 1048, name: 'Search Engine' },
                  { value: 735, name: 'Direct' },
                  { value: 580, name: 'Email' },
                  { value: 484, name: 'Union Ads' },
                  { value: 300, name: 'Video Ads' }
                ],
                emphasis: {
                  itemStyle: {
                    shadowBlur: 10,
                    shadowOffsetX: 0,
                    shadowColor: 'rgba(0, 0, 0, 0.5)'
                  }
                }
              }
            ]
          })
        }
      })
    </script>
  </body>
3.工程化开发入门
脚手架 Vue CLI
- 开发 Vue 的两种方式
- 核心包传统开发模式:基于 html / css / js 文件,直接引入核心包,开发 Vue
- 工程化开发模式:基于构建工具的环境中开发 Vue
- 基本概述
- Vue CLI 是 Vue 官方同的一个全局命令工具
- 可以快速创建一个开发 Vue 项目的标准化基础架子【集成了 webpack 配置】
- 优点
- 开箱即用,零配置
- 内置 babel 等工具
- 标准化
- 使用步骤
- 全局安装(一次): yarn global add @vue/cli 或 npm -i @vue/cli -g
- 查看版本: vue --version
- 创建项目架子: vue create project-name(项目名-不能用中文)
- 启动项目:yarn serve 或 npm run serve
- 开发 Vue 的两种方式
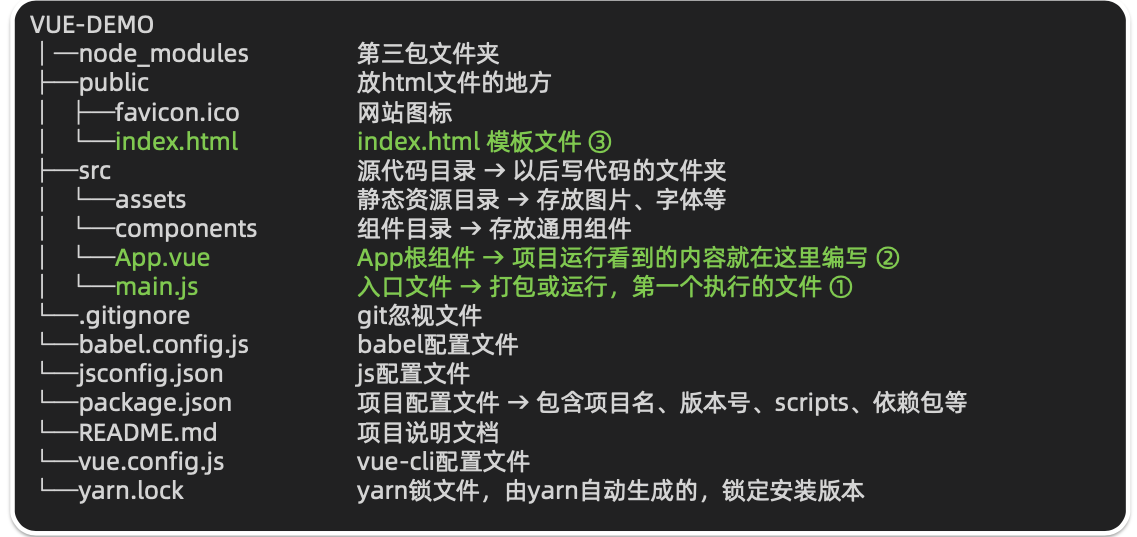
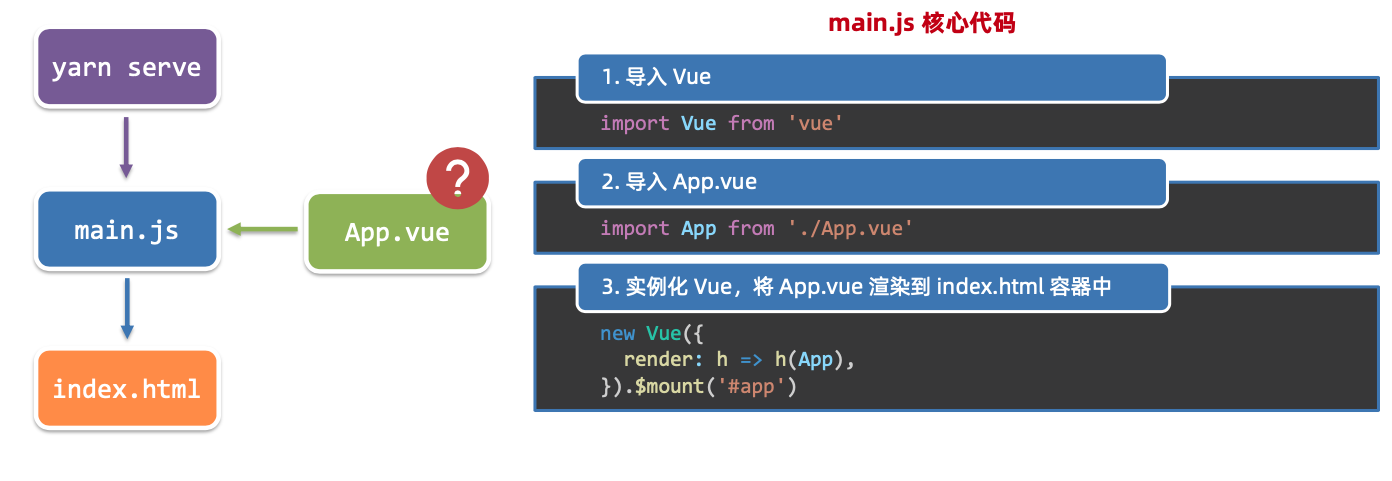
脚手架目录文件介绍 & 项目运行流程
组件化开发 & 根组件
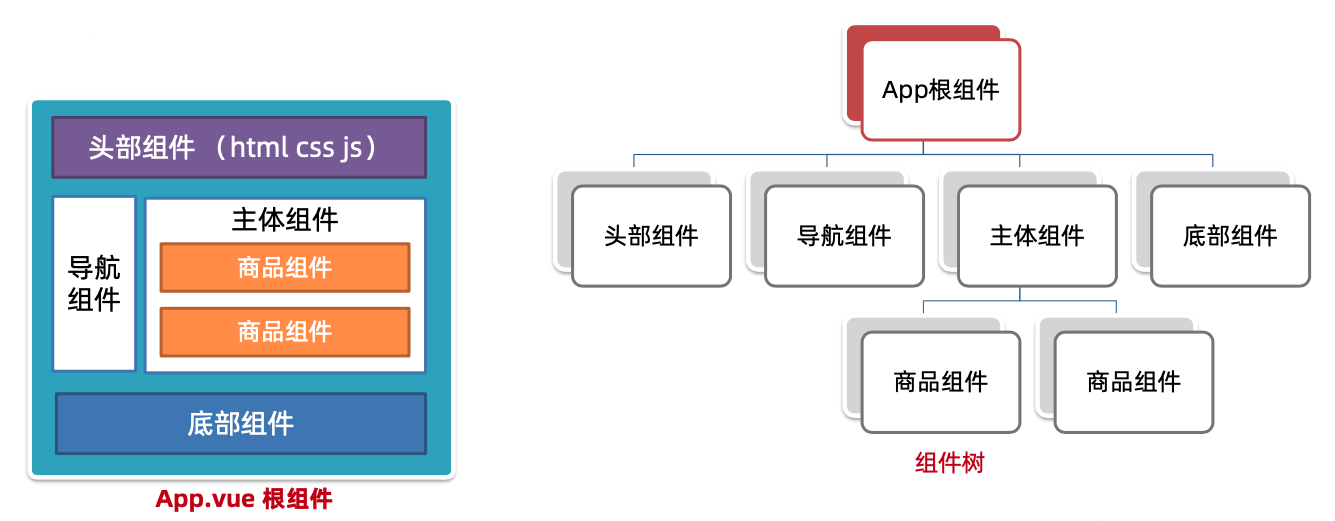
组件化
一个页面可以拆分成一个个组件,每个组件有自己独立的结构、样式、行为。便于维护,利于复用提高开发效率
根组件
整个应用最上层的组件,包裹所有普通小组件
App.vue 文件(单文件组件)的三个组成部分
语法高亮插件
三个部分组成
- template:结构
- script:js 逻辑
- style:样式
让组件支持 less
- style 变迁,lang = "less" 开启 less 功能
- 装包:yarn add less less-loader
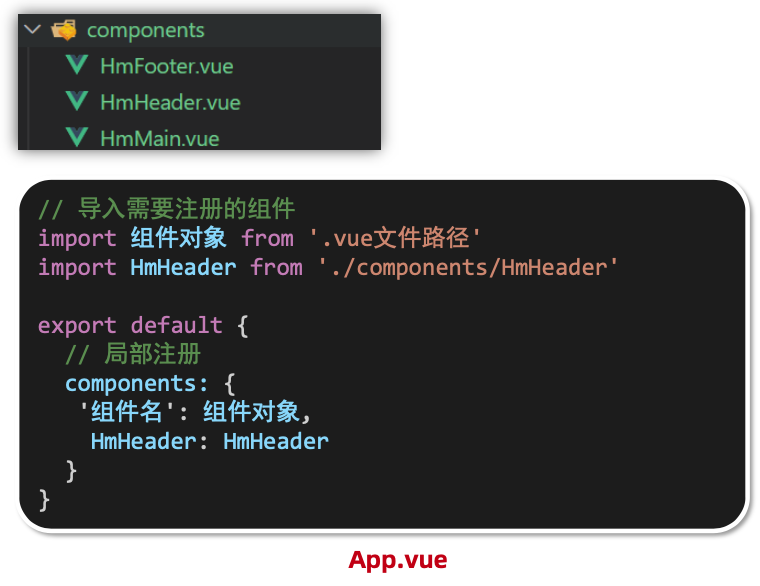
普通组件的注册时间
局部注册:只能在注册的组件内使用
创建 .vue 文件
在使用的组件内导入并注册
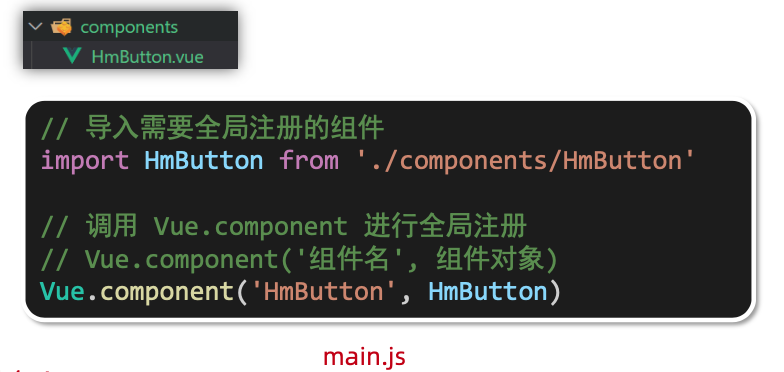
全局注册:所有组件内都可以使用
4.综合案例【组件拆分】
完成后结构
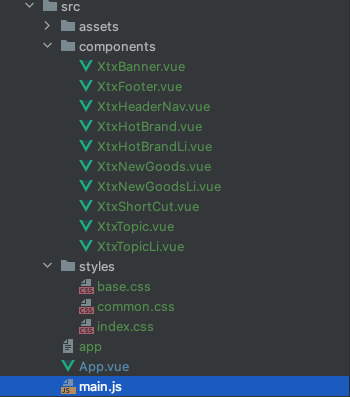
App.vue
<template>
  <div class="App">
<!--    快捷链接-->
    <XtxShortCut></XtxShortCut>
<!--    顶部导航-->
    <XtxHeaderNav></XtxHeaderNav>
<!--    轮播区域-->
    <XtxBanner></XtxBanner>
<!--    新鲜好物-->
    <XtxNewGoods></XtxNewGoods>
<!--    热门拼盘-->
    <XtxHotBrand></XtxHotBrand>
<!--    最新专题-->
    <XtxTopic></XtxTopic>
<!--    版权底部-->
    <XtxFooter></XtxFooter>
  </div>
</template>

<script>
import XtxShortCut from "./components/XtxShortCut.vue"
import XtxHeaderNav from "./components/XtxHeaderNav.vue"
import XtxBanner from "./components/XtxBanner.vue"
import XtxNewGoods from "./components/XtxNewGoods.vue"
import XtxHotBrand from "./components/XtxHotBrand.vue"
import XtxTopic from "./components/XtxTopic.vue"
import XtxFooter from "./components/XtxFooter.vue"

export default {
  components: {
    XtxShortCut,
    XtxHeaderNav,
    XtxBanner,
    XtxNewGoods,
    XtxHotBrand,
    XtxTopic,
    XtxFooter,
  }
}
</script>
<style>

</style>
main.js
```js import Vue from 'vue' import App from './App.vue' import './styles/base.css' // css 样式重置 import './styles/common.css' // 公共全局样式 import './assets/iconfont/iconfont.css' // 字体图标的样式
import XtxNewGoodsLi from "./components/XtxNewGoodsLi.vue"; import XtxHotBrandLi from "@/components/XtxHotBrandLi.vue"; import XtxTopicLi from "@/components/XtxTopicLi.vue"; Vue.component("XtxNewGoodsLi",XtxNewGoodsLi) Vue.component("XtxHotBrandLi",XtxHotBrandLi) Vue.component("XtxTopicLi",XtxTopicLi) Vue.config.productionTip = false
new Vue({ render: h => h(App), }).$mount('#app')
- 拿一个当做例子【XtxShortCut.vue】

  ```vue
  <script setup>

  </script>

  <template>
    <div class="shortcut">
      <div class="wrapper">
        <ul>
          <li><a href="#" class="login">请先登录</a></li>
          <li><a href="#">免费注册</a></li>
          <li><a href="#">我的订单</a></li>
          <li><a href="#">会员中心</a></li>
          <li><a href="#">帮助中心</a></li>
          <li><a href="#">在线客服</a></li>
          <li>
            <a href="#"
            ><span class="iconfont icon-mobile-phone"></span>手机版</a
            >
          </li>
        </ul>
      </div>
    </div>
  </template>

  <style scoped>
  .shortcut {
    height: 52px;
    line-height: 52px;
    background-color: #333;
  }
  .shortcut .wrapper {
    display: flex;
    justify-content: flex-end;
  }
  .shortcut ul {
    display: flex;
  }
  .shortcut a {
    padding: 0 15px;
    border-right: 1px solid #999;
    color: #fff;
    font-size: 14px;
    line-height: 14px;
  }
  .shortcut .login {
    color: #5EB69C;
  }
  .shortcut .icon-mobile-phone {
    margin-right: 5px;
  }
  </style>